

Happy New Year everyone! After my violin post, I got a request to make a blog post about pianos! I did my best to be concise, but alas, as a piano player, I have a lot to say about this topic. Be warned that there are a lot of factors to consider, and that it may be overwhelming for a beginner. If you have any questions, please feel free to comment and I’ll do my best to answer. Without further ado, here we go.
Unsurprisingly and perhaps understandably, even the cheapest pianos are going to be pricier than violins. They are larger by far, and even the electrics are far more complex than the fanciest electric violins, with some that even have different instrument sounds that you can play with. Think about the range of the instrument as well—whereas the violin stays in the treble clef range, the piano runs the full gamut, 88 notes total…

In my opinion, this makes it one of the most versatile instruments out there, a jack of all trades.
All this of course comes with a price, which brings us to the main topic of this post, and where hopefully this post can be a beginner’s guide to finding the right instrument for the right price.
If you’re a beginner, I will reiterate what I said in my violin post—you don’t need the fanciest instrument out there to learn proper technique. Stick with the basics to get your skills down, get that muscle memory down, and then worry about an upgrade if you’re still so inclined. You may find that the piano isn’t the instrument for you, and that’s okay.
Amazon will again serve as my go-to for models and prices. We’ll start with this one: the Rockjam 61, which looks to be a decent beginner’s package deal. First thing you might notice is that it’s not a full keyboard, as it clocks in at 61 keys rather than 88. For a beginner, this will definitely work. When I first started playing, I did not quite venture outside the 3-5 octave ranges that you see on the graphic above. This Rockjam covers octaves from the 2-6 range (again, refer to above graphic.) As you play more and more, you’ll find that eventually you’ll expand out into the lower and higher octaves, and I would suggest that only at this point should you consider buying a full keyboard to fit your needs.
This model (as well as the Casio CTK2400 and Hamzer 61) also comes with a mic and headphones. I’d wager a guess and say the headphones will be an extremely convenient feature for you. Typically, keyboards will have an audio jack that you can plug headphones into, and will allow for silent playing, which will be especially handy for those of you who have pets, neighbors, roommates, or young children trying to sleep.
Side note: Speaking only for me and my keyboard, I know that the aux jack in the back is not the standard audio jack that you’d find on a phone or tablet (not the 3.5mm size.) My keyboard is also about 10 years old at this point, so there’s a chance that maybe these aux jacks have slimmed down to the 3.5mm size (i.e. the Rockjam one looks like a 3.5mm size). But it may be something to check if you plan on getting a pair of headphones for your keyboard.
What does seem particularly useful about the Rockjam and the Hamzer model is the screen and learning app it comes with. The Casio’s “education pack” option also contains instructional software. The teaching mode will likely be helpful for beginners, especially for those who are trying to self-learn if a piano teacher and lessons are not an option.
As with the violin post, I do feel that I should again emphasize that these are meant for beginners, and will likely not sound as good as a more expensive model of keyboard. But I do believe that it is important to first learn technique and skill, before worrying about the sound. A Steinway concert grand will still not sound great in the hands of a beginner, and is a much heftier investment.
Now, if you’ve already mastered the basics, and are looking to spring for a new keyboard with additional features, some of the things you might be interested in may include: a full 88-key keyboard, damper or sustain pedals, weighted keys, and touch sensitivity.
The 88-keys should hopefully be self-explanatory, so let’s move right on to the damper pedal.
A damper pedal, generally the rightmost pedal on a traditional piano, prevents the dampers inside the piano from touching the strings, and allows the strings to continue resonating, even after you’ve released the key. Obviously, an electrical piano will function differently, but the goal is still the same—to sustain the note and allow it to ring after the key has been released.

The above Casio, Rockjam and Hamzer models did not appear to include this accessory, but for beginners, it is not entirely necessary. To start out, it is perhaps more important for the player to learn to hold the key down for the correct number of beats, rather than relying on the pedal’s reverb to pseudo-hold the note for them.
If you’re quite hellbent on having this pedal, though, perhaps for future use (though more advanced keyboards will likely come with this accessory), you can buy it separately. Of course, check to make sure that 1) your keyboard has an outlet for a damper pedal (usually found in the back somewhere), and 2) that it’s compatible with your model.
Weighted keys are a feature found on certain mid to high range keyboards. This is meant to make the electric piano feel more like a real piano. A traditional piano, whether upright or grand, will have weighted keys—the force needed to press the key down and have the hammer strike the strings. While there are certainly models that do a decent job with imitating the feel of a real piano, I personally believe the only thing that feels like a real piano is, well… a real piano. But I digress~ This is still a useful feature to have if you plan to migrate to a real piano at some point, and want to have less of a physical adjustment to make.
Of these additional features, touch sensitivity might be the most important. It basically means that playing volume is controlled by velocity (how hard or soft you press the keys.) The reason I say this may be the more important feature to consider is simply for the fact that in order to play the piano well, you must learn how to control not only where your fingers move, but how much strength to exert upon each key while playing to result in smooth, even playing. A non-touch sensitive keyboard will sound the same no matter how hard you smash the keys or how softly you depress them. Chances are, cheaper models of keyboards will not come with this feature.
Whew. Okay, so with all that said, if you’re looking to upgrade your keyboard experience with these features, then perhaps one of these will be the model for you.
Now, you may have seen that I mentioned technique a couple of times in this post. What technique am I talking about?
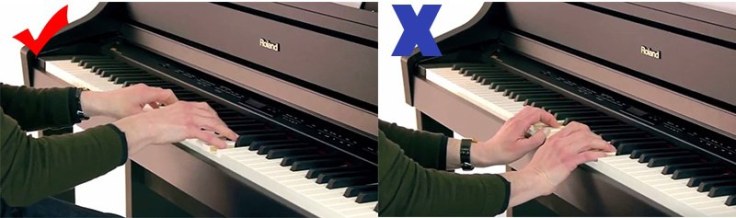
Hand shape. This is the first thing that most piano teachers will show you. Similar to how one must hold the violin correctly while playing, so it is with piano playing and the shape of the hand. Since this post focuses more on equipment than technique, so I’ll try to keep it short. Essentially, the player should aim to keep their fingers slightly curled and relaxed, such that the keys are depressed with only the fingertips and side of the thumbs. My teacher used to tell me to imagine that I was holding a tennis ball or small beanbag in my hand while playing. One way to ensure that you’re doing this correctly is to use little round pieces of tape. Put one on each fingertip, and place a corresponding piece of tape on your keys. The goal now will be to play such that the tape on your finger matches more or less evenly with the tape on the keys. This blog as well as this one from Roland (a reputable keyboard manufacturer) shows more tips and exercises for getting that hand shape down so it’s second nature.
(Side note: Keep your nails short in order to play with proper hand shape!)
As with the violin, a plethora of sheet music for beginners exists for the piano. In my previous post about violins, I talked about students learning via the Suzuki method. The Suzuki method is to violin students what the Alfred books are to piano students. While of course there are other methods to learn from, the Alfred books are what I used to teach my students back when I was still a teacher. They have books for both adult and young learners (young student books go from levels 1A through 6.)
If you’re past the beginning stages, though, another mechanical exercise to do (though rather tedious and boring… but may help in the development of accuracy, speed, flexibility, and precision), are the Hanon exercises. Developed by Charles-Louis Hanon, this is a compilation of sixty exercises including scales, arpeggios and octaves, to name a few. There’s some criticism as to whether these exercises are necessary to the development of good technique—some believe that these exercises help the student master techniques that are commonly found in pieces, and therefore have intrinsic value as building blocks. Others, however, believe that technique will come with musical practice, rather than physical drills. Whichever school of thought you belong to is entirely up to you. For whatever its worth, I will say that I did use both the Hanon and Czerny exercises.
In this post, I only looked at models that contained full-sized keys (as opposed to shorter, mini-sized keys targeted for small children.) It may be personal bias, but I don’t believe it’s necessary to buy mini-sized keyboards for kids. Besides the fact that they’ll be learning on an instrument that isn’t representative, dimension-wise, of the real thing, they’ll outgrow them and you’ll wind up having to buy another keyboard for them anyway.
Assuming I haven’t scared anyone off by now, I think that’ll be all for this post! Hopefully an aspiring pianist out there will find something useful in this post and get started on their piano playing. Again, if there’s any questions, or if you feel I’ve forgotten to address something, please let me know in the comments below!

This was a beautifully explained article. I loved the in-depth details, especially the miscellaneous details like hand shape and how a key works. I am buying the Hamzer 61 after your recommendation. Thank you for the guidance! 🙂
Thanks! Happy to hear it was helpful. Hope you enjoy your Hamzer!